How to create an Atari Hard Drive image for your ACSI2STM
So you have an ACSI2STM device and would like to create your own ACSI hard dick image.
The quick and easy way is to follow the steps available HERE in section 3. You will use one of the ready made image.
Now, if you want to create your own ACSI HD image with other sizes then follow the steps below. This solution will requires the following:
-
A PC computer
-
HATARI emulator running on this PC computer. Download it here: HATARI.
-
Raspberry Pi Imager. You can download here: Raspeberry Pi Imager.
-
ICD Driver floppy image. You can get it here: ICDPRO.ST
-
A microSD card
-
Your Atari with an ACSI2STM device (no floppy required)
Create an empty IMG
You can easily do this with Windows and the CMD command prompt. Press the Windows+R keys and enter cmd in the field. Then press Enter. Windows opens the path in your My Documents, the path is of course called differently in your case.
If you know a little about MS-Dos, you can go to a different path here, but this is not necessary. Now, with this command we create an empty IMG with a capacity of 2 GB! It is best to copy this out here and put it in CMD:
fsutil file createnew atari_2gb.img 2147483648
You can make any size you want, but it is better to use round size numbers. Multiple of 1014. Here are some example
512Mb = 536870912
1Gb = 1073741824
2Gb = 2147483648
4Gb = 4294967296
=size x (1024 x 1024 x 1024)
Formatting the hard disk
Total disk space and partition size will depend of your driver and the TOS version on your Atari.
The original driver from ATARI (AHDI) cannot handle 4 GB and partitions should be kept under 16Mb.
With ICD Pro driver, the limit are much higher. However, you must also pay attention to which TOS you are using:
-
With TOS 1.00/1.02, partitions of up to 256 MB can be created
-
With TOS 1.04-3.06, partitions of up to 512 MB can be created
-
With TOS 4.0x, partitions of up to 1 GB can be created
Keep these limits in mind. You need to setup your disk image for your target Atari TOS.
We can create 512Mb partitions, but it is better to set them at 256Mb in order to be compatible with all Atari computers. 256Mb is already a lot and you can have up to 14 partitions per disk.
Setup your empty IMG in HATARI
We assume you already installed HATARI on your computer and you downloaded ICDPro floppy image. Go back t the top of this page to get the various links.
The screenshots on this page have been done with an Atari ST, 1Mb RAM, TOS 1.04 UK in Med-Res mode. Other TOS may differ a bit.
Start your HATARI and press F12. There you select
Hard disks ==> ASCI ==> Browse ==> atari_2gb.img ==> Back to Main Menu
Floppy disks ==> Drive A ==> Browse ==> ICDPRO.ST ==> Back to Main Menu
Reset machine ==> OK
HATARI now boots automatically from drive A, which the ATARI always does if no hard disk is connected. Since the ICDPRO diskette is in drive A, the boot loader is now also started and the connected virtual hard disk is recognized!
(If it is not the case, double-click on drive A. Then double-click on ICDBOOT.PRG)
Now double-click on drive A. Then double-click on ICDFMT.PRG
Select ID 0 and click on CONTINUE
Then we are in the main menu. This is not as complicated as it looks here. Click on the 1 next to Verify Passes
Turn the 1 into a 0 Then click OK. This will stop the verification. If you keep it to 1, the format step will take ages and we do not really need it since our disk is virtual and not prone to bad sectors.
Then click on FORMAT. The following warning will be skipped.
Now, ICD may set all partitions by default. This looks more complicated than it is. Click on CLEAR to remove the proposed partition and setup yours.
Good practice would be to set the first one to 16Mb max to stay compatible with even the oldest Atari ST.
In my example, I set C with 16Mb and the other partition at 256Mb. This will ensure my hard drive works on any Atari ST. Even the original ST from 1995 with TOS 1.00
Now, click PARTITION ENTIRE HARD DISK
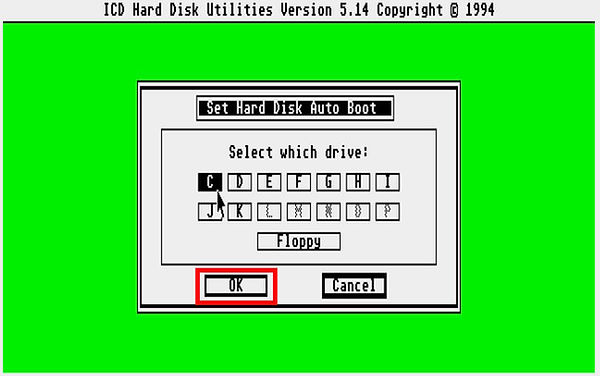
But you are not quite finished yet. Now exit ICDPRO and start HDUTIL.PRG. There click on BOOT:
The program will now show you the formatted hard disk. Select C (this is usually marked) and then OK. Confirm the next dialog as well. You can then close the program again.
Finally, press F12 again and remove the floppy disk under Floppy Disk by clicking on Eject. Then don't forget to save! Now perform a restart. Now you see this, all partitions are displayed.
If you only see C drive, that's normal. older TOS do not add the other drive automatically.
Just click one on your C drive, then got to Options >> Install Disk Drive
Change identifier to D and change the name is your want. Then click INSTALL
Repeat for E and all other partitions.
Once you are happy with your setup, go to Options >> Save Desktop
Transfer your hard disk image to a microSD
The last actions will to transfer or apply the img file onto a microSD card.
You do this using the Raspberry Pi Image.
Launch the imager.
Under Operating System, select Use custom then find and select your image file you just created.
Under Storage, select your microSD card you just inserted into your computer.
Then click NEXT
Click NO to OS customisation
Then YES to continue
Wait until the image completely finish to write and Verify
Exit the imager, eject your microSD card.
You can now insert your microSD card into your ACSI2STM device and start your Atari.
you should get the same setup as the one you just did in HATARI.
You could use ICD on a floppy disk to change the partition
Conclusion
You could be tempted to create hard disk images as big as possible with very large partitions. Try and see what your version of TOS allows you to do.
You do not have to go back to HATARI for that. Once you have the image on your microSD running on your real Atari via the ACSI2STM, you can reconfigure the partitions directly using ICD on a real floppy.
BUT keep in mind that TOS OS and applications were developed in the 80s when hard drive were no more than 100Mb. Some applications may not run well with very large partitions.
I would advise to keep it simple and within the limits of your oldest Atari/TOS. You may want to use your microSD on a friends computer and he/she may have an old ST on TOS 1.0
I personally keep the first partition at 16Mb for boot programs and all other partitions at 256Mb
I also limit the total disk space to 1Gb. This is more than enough. I prefer to have multiple microSD and swap them depending of the activity I do. The ACSI2STM also allows up to 3 microSD cards.